Care of a Tracheostomy
Routine care of the tracheostomy stoma and tube.
It is important to keep the skin around the tracheostomy clean and dry. This will help prevent bacteria (germs) from growing. Bacteria can cause infection or skin rashes.
Clean and look at the stoma at least twice daily, and as needed. Watch for skin breakdown, redness, swelling, crusting, drainage (particularly green or yellow in color), or bad odor.
Supplies You Need
Gather all your supplies in a clean work area.
- Hydrogen peroxide (if needed)
- Water (You can use water from your sink faucet. Do not use well water.)
- Mild soap
- 2 lint-free cloths
- Cotton-tipped swabs (You can use Q-tips® or another brand.)
- New trach ties
- Split gauze dressing
- Gloves (optional)
- If trach has inner cannula, gather disposable inner cannula or trach cleaning brush, if cannula is reusable.
Steps to Clean
- Wash your hands.
- Place child on back with small roll underneath shoulders to allow for neck extension and full view of trach.
- Check with your child’s provider to be sure it is safe for your child to lie in this position.
- Clean neck and stoma site with mild soap and water using lint free cloth or gauze.
- Start closest to the stoma and stroke outward in a circular pattern. Cleaning from stoma outward decreases the chances of foreign material entering the airway through the stoma.
- Cleanse exposed trach and flanges to remove any drainage or crusting—DO NOT remove the trach
- May use Q-tips to clean and dry under flange.
- Be sure to avoid getting water into stoma
- If crusting is difficult to remove-clean with mixture of ½ hydrogen peroxide with ½ water
- NOTE: Routine use of hydrogen peroxide may eventually increase skin irritation leading to breakdown
- Rinse with clean water.
- Dry skin and trach with dry cloth.
- Make sure no lint or debris enters trach.
- The use of split gauze/dressing under the trach tube is optional.
- Use of split gauze/dressing is often determined based on volume of secretions and skin condition around the trach tube.
- Avoid the use of creams, lotions or powders.
- If child has a cuffed tracheostomy, ensure cuff is inflated with prescribed amount of water.
- Check that ties are securely fastened, allowing only one finger/fingertip to fit between ties and neck.
- It is important to assess the trach stoma while cleansing for:
- Signs and symptoms of infection; redness, drainage—particularly green or yellow in color, bad odor, swelling, skin breakdown
- Granulation tissue which is new tissue that forms around the trach site. It will look red/pink and “beefy.”
Tracheostomy ties help to prevent the trach tube from falling out.Ties should be changed at least daily and more frequently, when they are dirty, wet, frayed or skin breakdown is noted. Look for rash, redness, or skin breakdown on neck area. You can perform trach tie changes at the same time as cleaning the stoma of your trach.
Ties can be made of cloth (twill tape) or have Velcro™. The most frequently used ties at Golisano Children’s Hospital are Velcro™ ties. Velcro trach ties may not be covered by insurance, although they are readily available for purchase from equipment suppliers. Please speak with your equipment supplier regarding obtaining the appropriate trach ties for your child.
Velcro™ trach ties may be washed with soap and water to be reused if necessary. Assure that the Velcro still holds securely after washing.
Do not wash and reuse if there is an active yeast or bacterial infection.
Supplies You Need
Gather all your supplies in a clean work area.
- Scissors (if needed to cut cloth ties)
- New tracheostomy ties
- Lint-free wash cloth
Steps for Tie Changes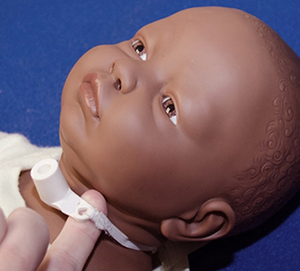
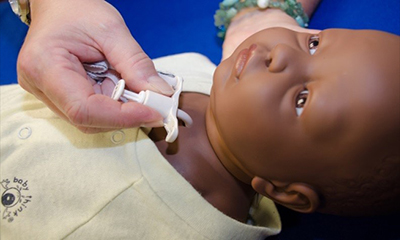
- Wash your hands
- Place two fingers of one hand on both sides of flange to hold trach tube in place
- Undo tie on one side of neck and slide out of flange
- If performing trach tie change and site care at the same time this is where you would clean/rinse/dry site on first side of the neck.
Only undo one side of trach ties at a time. This allows you to quickly replace trach ties in case of an emergency during trach tie change. - Slip one side of the NEW tie through flange opening and securely fasten
- Undo tie on other side of the neck and slide out of flange
- If performing trach tie change and site care at same time this is where you would clean/rinse/dry site on other side of neck
- Slip other side of NEW trach tie through second side flange and securely fasten
- Check that ties are securely fastened, allowing only one finger/fingertip to fit between ties and neck. You may need to cut trach ties if they are too long.
Watch a video on how to change a tracheostomy tube.
Tracheostomy tube changes are performed routinely in an attempt to keep the trach tube clean and prevent mucus which can plug the tube from forming.
Your doctor can help decide how often the tracheostomy tube will need to be changed. This may be once a week or as long as a month. Many brands of trach tubes can be cleaned and reused multiple times. You will receive a new trach from your equipment supplier as frequently as your insurance will allow. This will range from monthly to every 6 months.
Have another person help you with trach changes until you are confident doing it by yourself.
Gather All Equipment
![]() It is very important to gather all equipment in one place before starting any trach tube change. Once you remove the trach, your child needs to have the new trach inserted immediately to keep their airway open and keep breathing.
It is very important to gather all equipment in one place before starting any trach tube change. Once you remove the trach, your child needs to have the new trach inserted immediately to keep their airway open and keep breathing.
Supplies You Need
- Gather all your supplies in a clean work area.
- Tracheostomy tube the same size and length of the tube currently in place
- Tracheostomy tube one size smaller than one in place (if available)
- Obturator
- Tracheostomy ties
- Water-based lubricant or saline drops
- Scissors
- Lint-free cloth
- Split gauze/dressing
- Suction supplies
- Self-inflating rescue bag
- Oxygen (optional based on individual child)
For cuffed tubes you will also need:
- Empty syringe
- Syringe with water to prescribed amount
Changing trach tube will often cause a child to cough.
![]() Be prepared to suction or wipe secretions away. Do not let go of the tube until ties are securely fastened. Inserting a new tube can irritate the trach. You may see pink tinged secretions following a trach tube change. If you see bright red blood, report this to your doctor or nurse.
Be prepared to suction or wipe secretions away. Do not let go of the tube until ties are securely fastened. Inserting a new tube can irritate the trach. You may see pink tinged secretions following a trach tube change. If you see bright red blood, report this to your doctor or nurse.
Steps to Change Tube
- Wash your hands
- Prepare suctioning equipment.You need to have this ready in case your child begins to cough up secretions.
- Place new trach ties onto one side of flange of new tracheostomy tube.
- Assure obturator is inside of new tracheostomy tube.
- For cuffed tracheostomy, check balloon on new tracheostomy tube by placing correct amount of water in balloon. Remove water.
- Place small amount of lubricant or saline drops on end of new tracheostomy tube.This is not always necessary however may be done to allow for easier, less traumatic insertion of new trach tube.
- NEVER use petroleum or Vaseline as lubricant
- Assure lubricant is water soluble.
- Place tracheotomy to be inserted on a clean surface with tip facing up. (Setting it on an unclean surface can increase chances of your child getting an infection.)
- Place child on back with small roll underneath shoulders to allow for neck extension and full view of trach.
- Check with your child’s doctor to be sure it is safe for your child to lie in this position.
- Suction child’s trach, if necessary.
- If child has cuffed trach, remember to deflate cuff.
- Unfasten trach ties on current trach, making sure to hold both sides of flange to assure tube stays in place.
- When ready, quickly remove old trach.
 Immediately insert new trach with obturator in one smooth curving motion with tip of trach directed towards back of neck. The tube should slide easily into place. Using force may cause injury, bleeding,and other problems.
- While securely holding trach in place, remove obturator immediately.
Removing the obturator allows for air to pass freely through the trach tube. Leaving an obturator in place will block a child’s ability to breathe through trach. - Feel for air movement.
- For cuffed tracheostomy, place correct amount of water into new cuff.
- Secure trach ties around neck, allowing only one finger to fit between ties and neck. You may need to cut trach ties if they’re too long.
- Suction child’s trach.
- Make sure to check your child’s skin color and oxygen levels. Check to see if your child’s chest is rising and falling normally.
![]() Help! I am having a problem with tube change.
Help! I am having a problem with tube change.
If the new tube does not pass easily, do not force it!
- Keep yourself and your child calm.
- Reposition your child so the stoma is in full view and their head is extended back.
- If there are secretions at the stoma, wipe them away with gauze or clean towel.
- Double-check that you have the correct size trach tube.
- Lubricate tube.
- Try again to insert the tube.
- If your child’s condition allows, you can use a trach tube one size smaller than the one you removed. Stomas sometimes get smaller. This can happen because of scarring, swelling, or other issues. If this is the case, a smaller trach tube may pass and fit better than previous sized trach.
- Do this only if your child’s condition permits.
- If you still cannot place the tube, call 911.
- If you are unable to replace the trach tube, and the child is having trouble breathing, you may give rescue breaths with a mask over child’s nose and mouth.
- Be sure with rescue breathing to cover the stoma (hole) with gauze and tape.
- Covering the stoma makes sure that air does not escape from the stoma during breaths.
- Continue assisted breathing for child with bag and mask until help arrives.
![]() Be sure to ask your doctor if your child's airway allows you to bag your child with a mask over their nose and mouth.
Be sure to ask your doctor if your child's airway allows you to bag your child with a mask over their nose and mouth.
Check with the manufacturer to be sure the trach tube your child has can be cleaned and reused.
Some trach tubes are double cannulated. Some inner cannulas are disposable and should be discarded daily. If the inner cannula is reusable, they should be cleaned twice daily and as needed.
![]() After each cleanse, inspect the tube for cracks, tears, or too much stiffness. Inflate the cuff (if present) to check for leaks. If the tube (or cuff) is damaged, don't re-use it.
After each cleanse, inspect the tube for cracks, tears, or too much stiffness. Inflate the cuff (if present) to check for leaks. If the tube (or cuff) is damaged, don't re-use it.
Shiley
Supplies Needed
- Dish soap
- Normal saline or water
- measuring cup
Cleaning Shiley Trach Tube
- Wash your hands
- Place cannula and obturator in a mixture of 1/2 dish soap and 1/2 water. (Example: To make 1 cup of this mixture, use ½ cup of dish soap and ½ cup of water.)
- Let tracheostomy tube soak in this solution for no longer than 30 minutes. (Longer than 30 minutes damages the tube.)
Note: Metal tubes should not be left to soak for long periods of time. - Clean the inside of the tracheostomy tube with a trach brush or pipe cleaner.
- Rinse with normal saline or water.
- Air dry on a clean surface.
- After the trach tube and obturator are completely dry, store in a new resealable plastic zip lock bag. This keeps everything clean and germ-free.
Bivona
Supplies Needed
- Soap
- Normal saline or water
- Measuring cup
- Pan with lid, for boiling water
Cleaning Bivona Trach Tube
- Wash your hands
- Wash the trach tube and the obturator in warm soapy water.
- Clean the inside of the trach tube with a pipe cleaner.
- Rinse trach tube with normal saline or water.
- Place water in a pan and bring to a boil.
- Place tracheostomy and obturator in boiling water and then turn water off.
- Cover pan and let cool.
- Once water is cool, remove the tube and obturator from the water. Hold the tube by the flanges and the obturator by its handle.
Do not touch the tip of the tube or obturator, to keep it from getting dirty. - Air dry on clean surface
- After the trach tube and obturator are completely dry, store in a new zip lock bag. Using new, resealable plastic bag. This keeps everything clean and germ-free.