In Case of Emergency
![]() Call 911
Call 911
If your child is having trouble breathing, the trach tube falls out or becomes blocked, and you cannot immediately solve the problem, call 911.
If Your Child has Trouble Breathing
- Check that the trach tube is clear of secretions. Suction if needed.
- If you are not sure the tube is clear, remove the inner cannula, if present. If there is not an inner cannula, take out the trach tube and replace immediately with a new trach tube.
- If your child is on oxygen, check that tubing is not kinked and the tank is not empty.
- If applicable, give your child prescribed nebulized saline, albuterol, or saline drops.
- After nebulizer treatments, perform Chest Physiotherapy (CPT). Then suction your child.
- Contact 911 following guidelines provided in the American Heart Association (AHA) CPR course.
- You, and anyone that will be caring for your child at home, should complete an AHA CPR course. Your Care Coordinator will discuss how to find a local AHA CPR course.
Signs of Distress
Respiratory distress is when your child is having trouble breathing or can’t take in the amount of oxygen their body needs. It’s important to know your child’s signs of breathing trouble.
It’s important for you to know your child’s baseline breathing effort, oxygen levels, and breathing rate.
- You will be monitoring your child’s oxygen saturation at home using an oxygen saturation monitor (oximeter). We’ll tell you what a normal oxygen saturation is for your child. When the oxygen level drops below your child’s normal, that’s called “desaturation.”
- Breathing rate is the number of breaths your child takes in one minute. In order to count the respiratory (breathing) rate, place your hand on your child’s chest and count the number of times the chest rises in one minute.
Movement
- Retractions (sharp pulling in of the chest below and between the ribs with each breath)
- Shallow breathing
- Increase in breathing rate or effort
- Nostril flaring
- Restlessness
- Increased sleepiness
- Use of abdominal (belly) muscles to breathe
Sounds
- Rattling mucus not cleared with cough
- Stridor (an abnormal, high-pitched, musical breathing sound caused by a blockage in the airway. It is usually heard when taking in a breath.)
- Bubbles of mucus at trach tube opening
- Fast, noisy, hard breathing
- Grunting noise
- Periods of time where breathing completely stops (apnea)
- Wheezing (breathing with a whistling or rattling sound in the chest)
Skin
- Pale, bluish color over skin, lips, and nails
- Damp and sweaty
- It's possible your child may need extra oxygen. Learn about oxygen therapy.
Bag Mask Ventilation
Watch a video on how to use an Ambu bag with a tracheostomy tube.
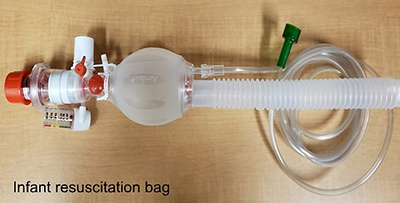 Bag-Mask ventilation is a way to deliver breaths and oxygen to your child when they are unable to adequately breathe on their own. You will use a resuscitation bag/ambu bag in order to squeeze air into your child’s lungs.
There are three different sizes of ambu bags. Your child will be sent home with the correct size. Be aware that as your child grows, they will need a bigger size ambu bag. Your vendor can supply you with this bigger size.
Use the resuscitation bag when:
- Your child stops breathing.
- Your child has signs of breathing problems.
- Poor or no chest rise
- Poor skin color or a drop in oxygen levels (O2 sats)
- Inadequate breath sounds
- Abnormally low breathing rate
- There is a problem with your child’s ventilator.
Steps for Bag-Mask Ventilation
- Turn on oxygen to resuscitation bag.
Flow should be 6-10 liters. - Attach the resuscitation bag to the tracheostomy.
- Gently squeeze breaths into your child.
Do not give too big a breath. This could hurt your child’s lungs. - Release the bag so your child can breathe out and the bag can fill up with air.
- Bag at a rate of 1 breath every 3 seconds. Watch for good chest rise.
- If you are not getting good chest rise, your child is not getting enough air.
- If child does not respond or breathing does not get better, call 911.
- Continue bagging until your child begins to breathe on their own or the ambulance arrives.
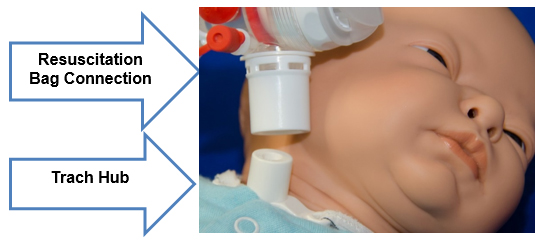
If your trach has a hub, the resuscitation bag fits directly onto the trach hub.
If your trach does not have a hub, you'll need an adapter that fits in the trach tube opening. You'll attach the resuscitation bag to the adapter.
CPR
If your child has trouble breathing, desaturations, or any other breathing problems, follow the steps outlined in the Respiratory Distress Pathway before starting CPR.
Plan for Emergency
Go-Bag
Problems may happen at any time. Whether planning for a short trip out of the house or a long vacation, it’s important to be prepared. Your child should have emergency equipment and supplies with them at all times. You will be taught how to pack your emergency bag before going home. Have this packed and ready to go at all times. When you return home, immediately replace any items used.
Watch a video showing a Go-Bag Go-Bag & Emergency Equipment List
Trach/Vent Action Plan
An action plan can help you, and other caregivers for your child, know what to do for a respiratory or trach-related problem. Work with your child's pulmonary team to create an action plan specific to your child's needs.
To request an example of a trach/vent action plan, please contact us at (585) 276-0724.