Low Profile Button Tubes
Low Profile Button Tubes
 Low Profile Balloon Tube (MIC-KEY Button or AMT Mini-ONE Button)
This is a skin level tube with a balloon inside the stomach. Additional extension tubing can be attached to the button to give feedings, medications and to vent the stomach if needed.
Caring for the Low Profile/Button Type G-Tube and Site
Cleaning the Site
- Wash your hands with soap and water before touching the G-tube site.
- Use warm soapy water on a Q-tip to clean around the G-tube once a day (more often if needed).
(May use ½ strength hydrogen peroxide instead if there is crusting around the tube that is difficult to remove with soap and water or if it is becoming reddened around the tube. If using ½ strength hydrogen peroxide be sure to rinse with plain water after cleansing.) - Pat dry.
- After 2 weeks from original tube placement/surgery, may have regular baths (submerge in water)
- Do not use heavily scented soaps or cleansers.
- Do not apply ointments or medications to the area unless instructed by your healthcare provider
Dressing
- Keep a split gauze or button buddy around the tube at all times
(Button buddy may be used 1 week after surgery) - Change it daily or when it becomes soiled/moist
- Be sure to turn the tube in the tract at least once daily (about ¼ of a turn)
Securing the Tube
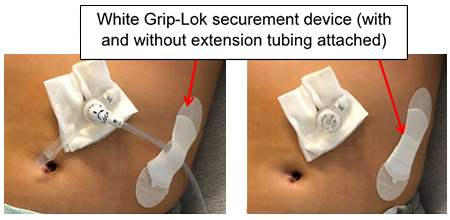

Movement and pulling on the G-tube site should be minimized to prevent trauma and leakage.
- You should always use some sort of securement device, such as a Grip-Lok or Cinch, or medical tape, such as Micropore (paper tape) or Hypafix, or a to secure the extension tubing whenever using the tube for feedings (continuous or bolus/intermittent).
- Always remove the extension tubing whenever you are not using the tube for feeding/giving medication AND whenever you move your child from bed to chair, etc.
- Onesies, one-piece sleepers, overalls, or other one-piece clothing will help keep the G-tube from being pulled out.
- Stretchy gauze/netting used to cover abdomen
- ACE bandage: May be used similar to an abdominal binder for younger children/infants. If using ACE wrap, cut it in half lengthwise and be sure not to pull it tightly around the abdomen or it will compress the G-tube into your child’s skin
- Abdominal binder: may be used for older children/adolescents
- Use a “tape tag” and safety pin to pin the tube to your child’s clothing to prevent accidental pulling at the G-tube site. (If using, be careful when undressing your child. You MUST remove the safety pin first!)
Bathing and Swimming
- May swim in a chlorinated pool 2 weeks after surgery as long as the exit site well healed
- May swim in a lake/ocean 2 months after surgery
Activity
- Your child may not participate in strenuous activities (contact sports, gym class, playground equipment, etc) for 1 month. After 1 month, your child may participate in strenuous activities if they keep the G-tube covered/secured (minimally for the first 3 months) to prevent dislodgement. After 3 months, your child should remain mindful of the G-tube, but an abdominal binder/cover is not required.
- Tummy time is okay for young infants. Your child may sleep or spend time on his/her belly. Make sure the G-tube is taped securely.
- If your child does physical therapy/occupational therapy, they may resume 2 weeks after surgery. Until then they may do exercises that do not place them on their belly or use core muscles.
Using the Low Profile/Button Type G-Tube
Giving Medications or Flushing a Low-Profile (Button Type) Tube
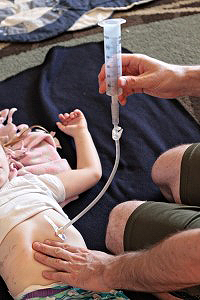
 Supplies needed: medications in liquid form, water for flushing, catheter tip or oral syringe, extension tubing
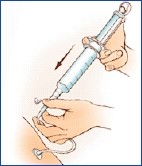
- Fill syringe with water (amount to be determined by your health care provider)
- Attach extension tubing to the low-profile G-tube
- Open the cap on one of the medication/feeding ports on the extension tubing and attach the tip of the filled syringe.
- Slowly push the water into the tube.
- If no issues flushing the tube, may repeat process with the medications. Be sure to clamp/unclamp the tube between each medication and flushes.
- Flush the tubing with water after giving medication.
- Be sure to disconnect the extension tubing when not in use.
Attaching/Disconnecting Extension Tubing from Low Profile Ballon Tube (Button)
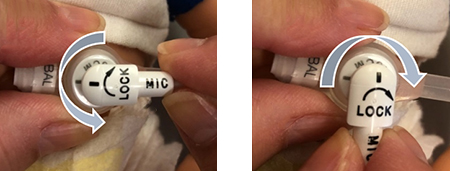 Be sure to attach the extension tubing to the button prior to flushing/starting feedings and remove extension tubing when G-tube not in use.
- Line up the black line on the extension tubing and button (left picture=unlocked), then twist to the right to secure (right picture=locked).
- Reverse this process to disconnect tubing after use.
Feeding Through a Low-Profile (Button Type) Tube
Supplies needed: Feeding pump, feeding pump tubing/bag, IV pole, formula at room temperature.
- Hang feeding bag on IV pole.
- Close clamp on G-tube extension set.
- Fill feeding bag with formula. (No more than 8 hours of formula at a time).
- Place tubing into the pump. Prime tubing (run the formula through the tubing) as instructed.
- Set the pump settings as instructed
- Connect pump tubing to the end of the G-tube extension tubing. (NOT the white balloon port on the button)
- Start the pump, making sure to unclamp the G-tube extension set.
- Once the feeding is completed, flush the G-tube as instructed, remove the extension tubing and rinse feeding bag and tubing with warm tap water.
- Discard or wash the feeding bag and tubing every 24h or as instructed.

Venting a Low-Profile (Button Type) Tube
- Venting is done to release air from the child’s stomach (when the child’s belly looks big/distended, the child seems uncomfortable, or the child needs to burp)
- Place a 60mL catheter tip syringe without the plunger on the end of the G-tube extension tubing. Unclamp the extension tubing.
- Allow air to come out through the tube into the syringe (1 – 2 Minutes).
- If air does not come out… remove the syringe, place the plunger back into the syringe.
- Then place syringe with plunger into the G-tube extension tubing.
- Gently pull back on the plunger to get the air out of the child’s stomach.
- Formula may come back into the syringe during venting, be sure to give any formula that backs up in the syringe back to the child taking care not to push in any air.
- Once you are done, be sure to remove the extension tubing from the G-tube and rinse/flush it to clean it.
Cleaning the Equipment
- Washing tubing with warm soapy water or half white vinegar/half water solution
- Flush tube through with warm water
- Hang to dry or flush air through tubing
- May reuse tubing for 2 weeks
- Rinse feeding bags after use
- Do not put tubing in the dishwasher
Emergency G-Tube Replacement Instructions - Low Profile/Button Type Tubes
- If Your Child’s G-tube is LESS THAN 3 months from original surgery
- If Your Child’s G-tube is MORE than 3 months from original surgery
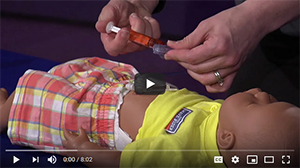
- Watch Video of Emergency G-Tube Replacement
