The 5 “P”s Behind a Great Instructional Video
IDEA Online Learning Team | URMC Institute for Innovative Education
Creating content for enduring, online educational materials? Use the 5 “P”s discussed here to help lay the foundation for a high-quality, high-impact final product.
1 PLAN with Learning Objectives and Audience in Mind
Work backwards: before creating content, identify key learning outcomes.
- Consider objectives that are knowledge, skill, and/or performance-based. What do you want your audience to know? To be able to do?
- Don’t create too many objectives! Be intentional. Segment your information so that 1-2 learning objectives are addressed per video.
- Keep your audience in mind to design objectives that are relatable, attainable, and relevant.
Try thinking about verbs when writing learning objectives. For example:
- Learners can differentiate between palliative care and curative treatment.
- Learners can identify the main sources of central line associated bloodstream infections.
- Learners can evaluate their serious illness communication skills using five pillars of excellence.
2 PRACTICE Presenting Your Content
Your final recording should not be your first time talking through your curated content!
- Using a basic script or structured bullet points may help prevent unwanted rambling or content redundancy.
- Identify how often you are reading verbatim from your slides. What differentiates your presentation from learners simply reading through your slides? What value do you add through your narration?
- Use your phone or Zoom to record audio of yourself practicing. Listen to the practice recording. Does your content “flow” naturally from one idea to another, or do ideas feel choppy? Are you using jargon? How is your pacing?
3 Prune Content to Decrease Cognitive Load
Though there is no hard-and-fixed rule, optimal run time for a content-based video segment is around 4-9 minutes (you may have multiple segments).
- Remove narration and/or content that does not serve your pre-identified core learning objectives. Though pruned content may be “nice to know,” leaving it in is more likely to decrease retention of essential material.
- Consider how you might activate learners’ visual comprehension channels. As the subject matter expert, identify any key images, charts, or animations that ought to be included in the final produced video. Figures accompanied by dense text are not recommended.
Interested in the research on multimedia learning, cognitive load, and viewer engagement? Check out these resources:
- Mayer, R. (2019). Thirty years of research on online learning. Applied Cognitive Psychology, 33(2), 152-159. https://doi.org/10.1002/acp.3482
- Carmichael, M., Reid, A., & Karpicke, J.D. (2018). Assessing the impact of educational video on student engagement, critical thinking, and learning: the current state of play. SAGE Publishing.
4 PREPARE Your Space
What do you see that could be improved in this video set-up?
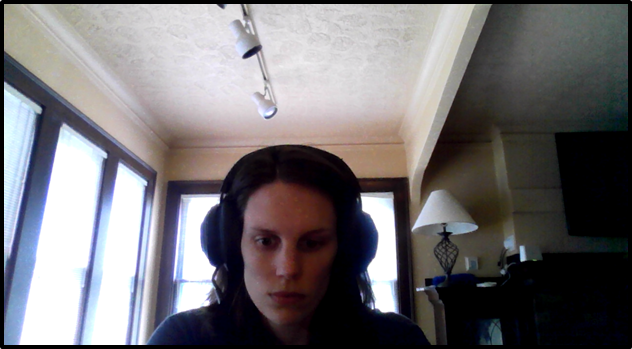
Here’s what we recommend you look at as you prepare to record:
Background
Your background should be clean, simple, and free from distracting items that pull attention away from the star of the show: you! Your clothes should be a different color from your background to help you stand out.
The University offers abstract and scenic Zoom backgrounds that showcase spaces around the medical and undergraduate campuses. Check out the options provided by the URMC Brand Center or from River Campus.
Framing
Sit or stand so that you occupy around 90% of the vertical frame—don’t let the background take over, but don’t cut off the top of your head!
Place/angle your camera as close to eye-level as possible. A camera pointing up at your face is not flattering.
Move your script and/or reference material as close to your camera as possible so that you, as frequently as possible, appear to be looking directly into the camera.
Lighting
Aim for soft light bouncing onto your face from the front.
- Two fixed desk lamps aimed at a neutral wall in front of you will often do an excellent job of lighting your face.
- Beware of backlighting: light from windows, lamps or overhead lights behind you that wash out your picture and leave you in the shadows.
- Windows can be a great source of natural light when in front of you; however, they may cause noticeable changes in light level unexpectedly.
Audio
Use an internal or external mic that is comfortable for you.
- Try a new microphone if trial audio sounds muffled, tinny, or “metallic,” especially with “s” or nasal sounds.
- A headset is a fantastic tool if you’re recording audio only, but it is not recommended if video of you speaking is going to appear in the final video project.
- Reminder: your mic will pick up on more than your voice, so be sure you are recording in a place without external disruptions. Silence your phone (not vibrate!), mute your computer’s system sounds, and put away any tempting objects to tap/fiddle with to avoid distractions and audio disruptions.
5 PERFORM!
A confident, conversational tone is typically best received by viewers.
- Speaking with your hands is fine—encouraged, even—but fiddling with pens, papers, or chairs creates unwanted background noise.
- If you do experience a disruption—a dog barking in the background; a running fan or air conditioning unit; an unexpected cough, hiccup, or scratch—do not try to talk through it. Take a breath, stay still, and mentally count to three. Start the section or sentence over. Post-production editing can piece together good “takes” easily, but it cannot remove noises made while you are speaking.